
The Best-Selling Savory Garlic Bagel Recipe For Bakeries 2025
There’s something magical about biting into a hot garlic bagel. The inside is chewy, and the crust is golden and crispy. The strong, spicy taste of garlic fills the whole thing. This guide will show you how to make these delicious bagels, no matter how much baking experience you have or how new you are to it. Additionally, we will talk about how a good dough mixer machine can change the way you bake.
Why garlic is a great thing to put in bagels
To be honest, garlic isn’t just good for you; it makes food taste better and has many health benefits. Baking garlic into a bagel makes for a tasty, healthy treat that tastes rich without making you feel bad.
Antioxidant-rich
Allicin and other antioxidants found in garlic help protect your body from free radicals that can be dangerous. These antioxidants are like little fighters; they fight inflammation and keep your body in great shape.
Boosting Your Immune System
There are times when all of us wish our defense systems were stronger. Because garlic naturally boosts the immune system, these bagels are not only tasty but also a good choice for people who want to avoid getting sick this season.
Advantages for Heart Health
Keeping your heart healthy is very important, and garlic can help by lowering cholesterol and keeping blood pressure in check. As part of a healthy, well-balanced diet, eating garlic bagels can help keep your heart happy and healthy.
Gut-friendly goodness
A healthy gut is important for your overall health. Garlic contains prebiotic substances that support the growth of healthy gut bacteria. That means that every bite of your garlic bread is also good for your stomach.
Taste without the guilt
You won’t find much fat in garlic bagels, but they taste great. This means you can enjoy a tasty treat without thinking about eating too many calories, which is great for living a healthy life.
How We Make Garlic Bagels (Step by Step)
To make garlic bagels, let’s break the process down into easy steps that you can do. I promise that if you practice a little and get the right tools, you’ll be able to make bagels at home that taste like they came from a bakery.
Step 1: How to Make Great Bagels
Getting the dough ready
Starting with a simple dough mixture, making a perfect bagel is all about using a commercial dough mixer. These mixers are made to handle the heavy, dense dough that bagels need. They make sure that all the ingredients are well mixed in and that the gluten develops properly, which is important for giving the dough its signature chewy texture.
First, use the mixer to mix the high-gluten flour, yeast, salt, and water together. It is important to mix the dough until it becomes smooth and elastic. Depending on how fast and strong your mixer is, this process should take between 10 and 12 minutes. The dough is ready when you can stretch a small piece of it between your fingers into a thin, almost clear membrane without it tearing. What this means is that the dough is ready.
2. How to Shape the Bagels
After a brief period of rest, it is time to shape the bagels after the dough has been mixed. First, divide the dough into portions of equal size, typically weighing between 100 and 120 grams each. Doing this will make sure that your bagels bake evenly and stay the same size.
Next, take a piece and roll it into a ball. Then, use your hand to make it a little flatter. Make a log or rope out of the dough that is about 20 cm long. The rope should be flattened, wrapped around, and pressed into. This will give you the classic bagel shape. By using this method, you will create a round, plump dough ring, which is what defines the perfect bagel.
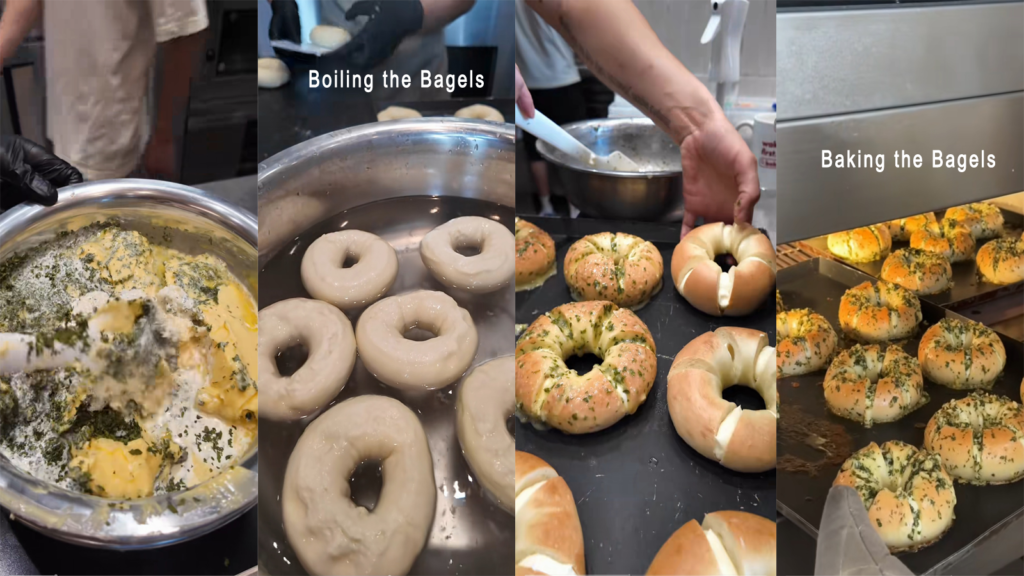
3. Boiling the Bagels
The most important part of making bagels is the boiling. That’s what makes them chewy and gives the crust its shine. Get a big pot of water very hot. A little honey or malt syrup added to the water (about 1-2 tablespoons per liter) can make the bagels taste and look better.
Carefully place the shaped bagels into the boiling water one at a time, being careful not to crowd the pot. Boil them for one to two minutes on each side. You can change the time of the boil to suit your tastes. The longer it goes on, the denser the bagel will be. The starches in the dough are also pre-gelatinized when it is boiled. This helps set the crust and keeps the bagel from rising too much when it is baked.
4. Baking the bagels.
Once they are boiling, put the bagels on a baking sheet lined with parchment paper. Warm the oven up to 430°F (220°C). After the oven is hot, bake the bagels for 15 to 20 minutes, or until they turn a deep golden brown color. That delicious smell coming from the kitchen as the bagels bake will make you want to eat them right away.
Take the bagels out of the oven and set them on a wire rack to cool. It keeps the crust crunchy while keeping the inside soft and chewy.
Step 2: Preparing the Garlic Butter Spread
Get ready for a delicious garlic butter spread while your bagels cool down. This spread goes great with fresh bagels because it adds a savory, buttery layer that makes the flavors stand out.
Begin by peeling and chopping a few garlic cloves very small. Feel free to change the amount of garlic to your liking, but 4-5 cloves are best for a strong, garlicky taste. In a bowl that can handle heat, mix the minced garlic with a lot of softened butter, honey, heavy cream, chopped parsley, and a pinch of salt. Place the bowl over a pot of simmering water and stir the mixture all the time until the butter is completely melted and everything is well mixed.
When the butter is completely melted, add the egg and stir the mixture slowly and continuously. Don’t heat the mixture too much, or the egg will scramble. Instead, try to make it smooth and creamy so it’s easy to spread.
Step 3: Getting the bagels ready to bake
Once the bagels have cooled down and the garlic butter spread is ready, it’s time to get them ready for one last bake. When you cut each bagel in half, be careful not to go all the way through. This will let the garlic butter soak into the bread, giving it flavor without making the bagel fall apart.
Use the garlic butter spread to cover the cut side of each bagel quarter. Make sure it’s not too wet. You don’t want the bagel to get too wet, because that could make it lose its crispness while it’s baking.
Step 4: Finish baking and serving.
Once more, heat your oven up to 220°C (430°F). Spread the bagels with butter on a baking sheet. Bake for 8 to 10 minutes, or until they are golden brown and the garlic butter has melted into the bread. Since each oven is different, keep an eye on the bagels and change the baking time as needed to get the right color and texture.
After taking the bagels out of the oven, let them cool down a bit before you serve them. The outside should be golden and crisp, and the inside should be soft and chewy. The garlic butter gives the bagel a rich, savory note that goes well with its natural flavor, making every bite a pleasure.
Why Choose Our Garlic Bagels?
It’s really fun and satisfying to make garlic bagels at home. These treats are both tasty and good for you, and they give you the satisfaction of mastering an old baking tradition. With a little practice and the right tools, especially a dough mixer that you can count on, you’ll be able to make bagels that taste like they came from a bakery and wow your family and friends.
Remember that every baker has their own style, so feel free to try different flavors and methods. Whether you adhere to the traditional garlic bagel recipe or experiment with one of our amusing adaptations, relish the process and appreciate each morsel.
Frequently Asked Questions (FAQ)
What Makes Garlic Bagels So Special?
Garlic bagels are a wonderful blend of taste and nutrition. They combine the irresistible flavor of garlic with a chewy, dense texture—plus, they’re packed with antioxidants and other health benefits.
Do I Really Need a Dough Mixer Machine?
You can mix dough by hand, but a dough mixer machine is faster and makes sure that the dough is always the same and well-developed. It’s a smart investment for anyone serious about baking great bagels.
Can I Make Gluten-Free Garlic Bagels?
Absolutely! With a good gluten-free flour blend and a few adjustments, you can create delicious gluten-free garlic bagels that still capture all the wonderful flavors.
How Long Should I Boil the Bagels?
Every bagel should be boiled for one to two minutes on each side. Adjust the time depending on how chewy or dense you prefer your bagels to be.
Can I Prepare Bagels Ahead of Time?
Yes, you can shape your bagels ahead of time and let them rise slowly in the fridge. Before you boil and bake them, just let them cool down to room temperature.